How to Gain Server-Side Trust on the Client-Side? DPoP (RFC 9449)

Verifying client identity is crucial in data transmission, commonly achieved through mutual Transport Layer Security (mTLS i.e. RFC 8705), where both client and server authenticate using digital certificates. However, obtaining client TLS certificates can be complex.

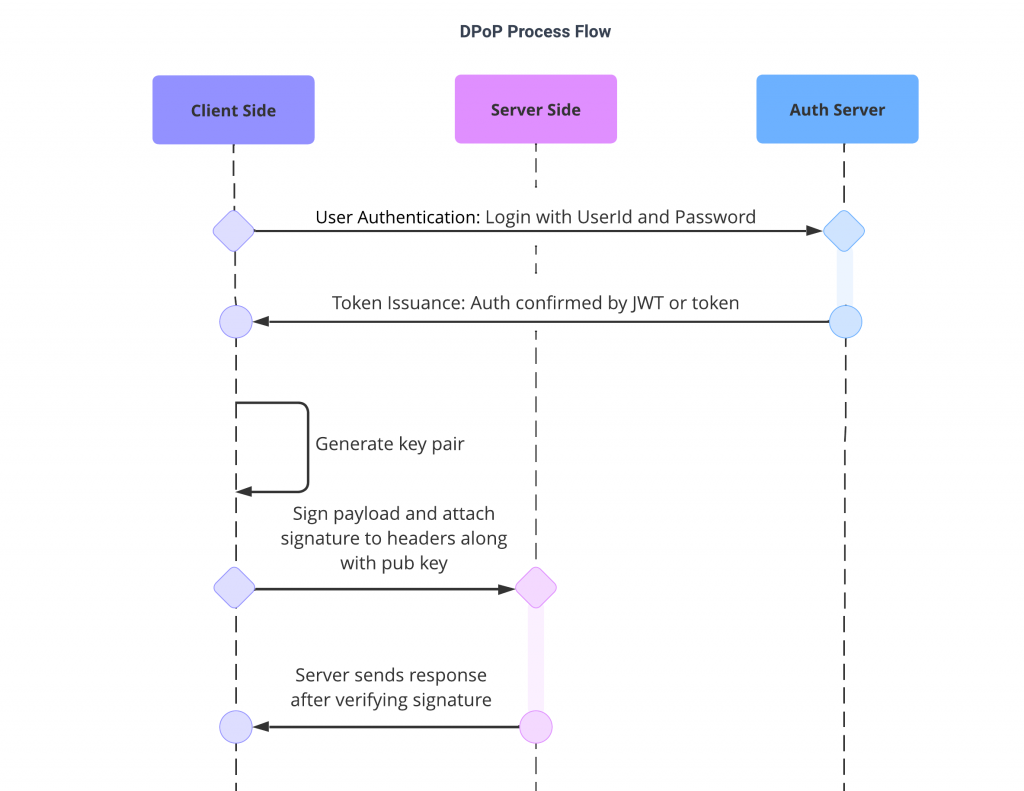
The DPoP (Demonstration of Proof of Possession – RFC 9449) specification, uses cryptographic key pairs instead of TLS certificates, simplifying the process. It securely links a token to a specific HTTP request and client by including a DPoP proof (typically a JWT with a cryptographic signature) with each access token request. This method enhances security against token theft and allows dynamic key generation, operating at the application level.

RFC 9449 vs RFC 8705

RFC 9449 (DPoP) simplifies authentication by letting clients generate a private and public key pair, eliminating the need for a TLS certificate. In contrast, RFC 8705 (mTLS) requires TLS certificates for bidirectional authentication, posing challenges in certificate distribution to clients.

Challenges with DPoP:

  • Securely storing and distributing public keys: Ensuring clients can register and update their keys securely without risk of unauthorized access or manipulation.
FeatureDPoP (RFC 9449)mTLS (RFC 8705)Token Binding (RFC 8471)
AuthenticationClient-side signature using key pairsClient-side TLS certificateClient-side cryptographic token
Integration LayerApplication layerTransport layer (HTTPS)Application layer
Complexity levelSimpler key managementRequires TLS certificate infrastructureBrowser support is limited
ProtectionToken theft, replay, unauthorized usageMan-in-the-middle attacks, eavesdroppingToken theft, replay
PerformanceLess overhead than mTLSSome overhead due to TLS handshakeNegligible overhead
FlexibilityCan be used with various authentication flowsTied to TLS-based connectionsCan be used with different protocols

1. Client: Generate Key pair using Web Crypto API (https://developer.mozilla.org/en-US/docs/Web/API/Web_Crypto_API)

  • Private keys can be non-extractable for more security.
  • For demonstration purposes, the encryption algorithm is fixed, and the JWK format is not utilized. 
  • You can execute code snippets in the browser console to view them in action.
const payload = { "key": "abcd" };
async function generateKeyPair() {
    const keyPair = await window.crypto.subtle.generateKey(
        {
            name: "RSASSA-PKCS1-v1_5",
            modulusLength: 2048,
            publicExponent: new Uint8Array([1, 0, 1]),
            hash: { name: "SHA-256" },
        },
        true,
        ["sign", "verify"]
    );
    return keyPair;
}
const keys =  await generateKeyPair()
console.log(keys);

2. Client: Sign a request using the Private key

//gen signature
async function signData(privateKey, data) {
    const encoder = new TextEncoder();
    const encodedData = encoder.encode(data);
    const signature = await window.crypto.subtle.sign(
        "RSASSA-PKCS1-v1_5",
        privateKey,
        encodedData
    );

    return signature;
}
const signature = await signData(keys.privateKey, payload);
console.log(signature);

3. Server: Signature Verification on the server side

//verify signature
const receivedPayload = { "key": "abcd" };
async function verifySignature(publicKey, signature, data) {
  const encoder = new TextEncoder();
  const encodedData = encoder.encode(data);

  const isValid = await window.crypto.subtle.verify(
    {
      name: "RSASSA-PKCS1-v1_5",
      hash: { name: "SHA-256" },
    },
    publicKey,
    signature,
    encodedData
  );

  return isValid;
}
const isValid = await verifySignature(keys.publicKey, sigV4, receivedPayload);
console.log(isValid);

4. Server: process data and send back requested data if the signature is valid

ZooKeeper JavaScript Implementation

ZooKeeper JavaScript Implementation

Def from Apache: ZooKeeper is a centralized service for maintaining configuration information, naming, providing distributed synchronization, and providing group services.

ZooKeeper Node Class Structure:

class ZooNode {
  key = null;
  value = null;
  watchers = [];
  children = [];
  constructor(key, value, watcherFn) {
    this.key = key;
    this.value = value;
    if (watcherFn) {
      this.watchers.push(watcherFn);
    }
  }
}

ZooKeeper Implementation:


class ZooKeeper {
  root = new ZooNode('root');

  /*get path segments*/
  getPathSegments(path) {
    const ps = path.split('/');
    ps.shift();
    return ps;
  }

  /*call watchers*/
  callWatchers(fns) {
    fns.forEach(fn => fn?.());
  }

  /*find a node and it's watchers*/
  dfs(root, pathSegments, idx, watcherFns = []) {
    if (!pathSegments.length) {
      return { node: root, watcherFns: [...root.watchers] };
    }
    const key = pathSegments[idx];
    watcherFns = watcherFns.concat(root.watchers);
    const nodeIdx = root.children.map(p => p.key).indexOf(key);
    if (nodeIdx > -1) {
      const nextRoot = root.children[nodeIdx];
      if (pathSegments.length === idx + 1) {
        watcherFns = watcherFns.concat(nextRoot.watchers);
        return { node: nextRoot, watcherFns };
      }
      return this.dfs(nextRoot, pathSegments, idx + 1, watcherFns);
    }
  }

  create(path, value) {
    const ps = this.getPathSegments(path, true);
    const newChildKey = ps.pop();
    const { node: parentNode, watcherFns } = this.dfs(this.root, ps, 0) || {};
    if (parentNode) {
      parentNode.children.push(new ZooNode(newChildKey, value));
      this.callWatchers(watcherFns);
    } else {
      console.log(`unable to add, path is not exist: ${path}`);
    }
  }

  setValue(path, value) {
    const ps = this.getPathSegments(path, true);
    const { node, watcherFns } = this.dfs(this.root, ps, 0) || {};
    if (node) {
      node.value = value;
      this.callWatchers(watcherFns);
    } else {
      console.log(`unable to update, path is not exist: ${path}`);
    }
  }

  getValue(path) {
    const ps = this.getPathSegments(path, true);
    const { node } = this.dfs(this.root, ps, 0) || {};
    if (node) {
      return node.value;
    } else {
      console.log(`unable to update, path is not exist: ${path}`);
    }
  }

  watch(path, fn) {
    const ps = this.getPathSegments(path, true);
    const { node } = this.dfs(this.root, ps, 0) || {};
    if (node) {
      node.watchers = [fn];//concat for multiple listeners
    } else {
      console.log(`unable to update, path is not exist: ${path}`);
    }
  }
}

Execution:

let z = new ZooKeeper();
z.create('/a', 'foo');
z.create('/a/c', 'bar');
z.create('/a/d', 'foo_d');
z.setValue('/a/d', 'foo_d_update');
console.log(z.getValue('/a/d')); 
//foo_d_update

z.watch('/a/d', () => { console.log('a watch at /a/d') });
z.watch('/a', () => { console.log('a watch at /a') });
z.setValue('/a/d', 'foo_d_update_again'); 
//1. a watch at /a 
//2. a watch at /a/d

z.setValue('/a', 'foo_a_update_again');
//a watch at /a

Recursive Implementation for Asyn.series

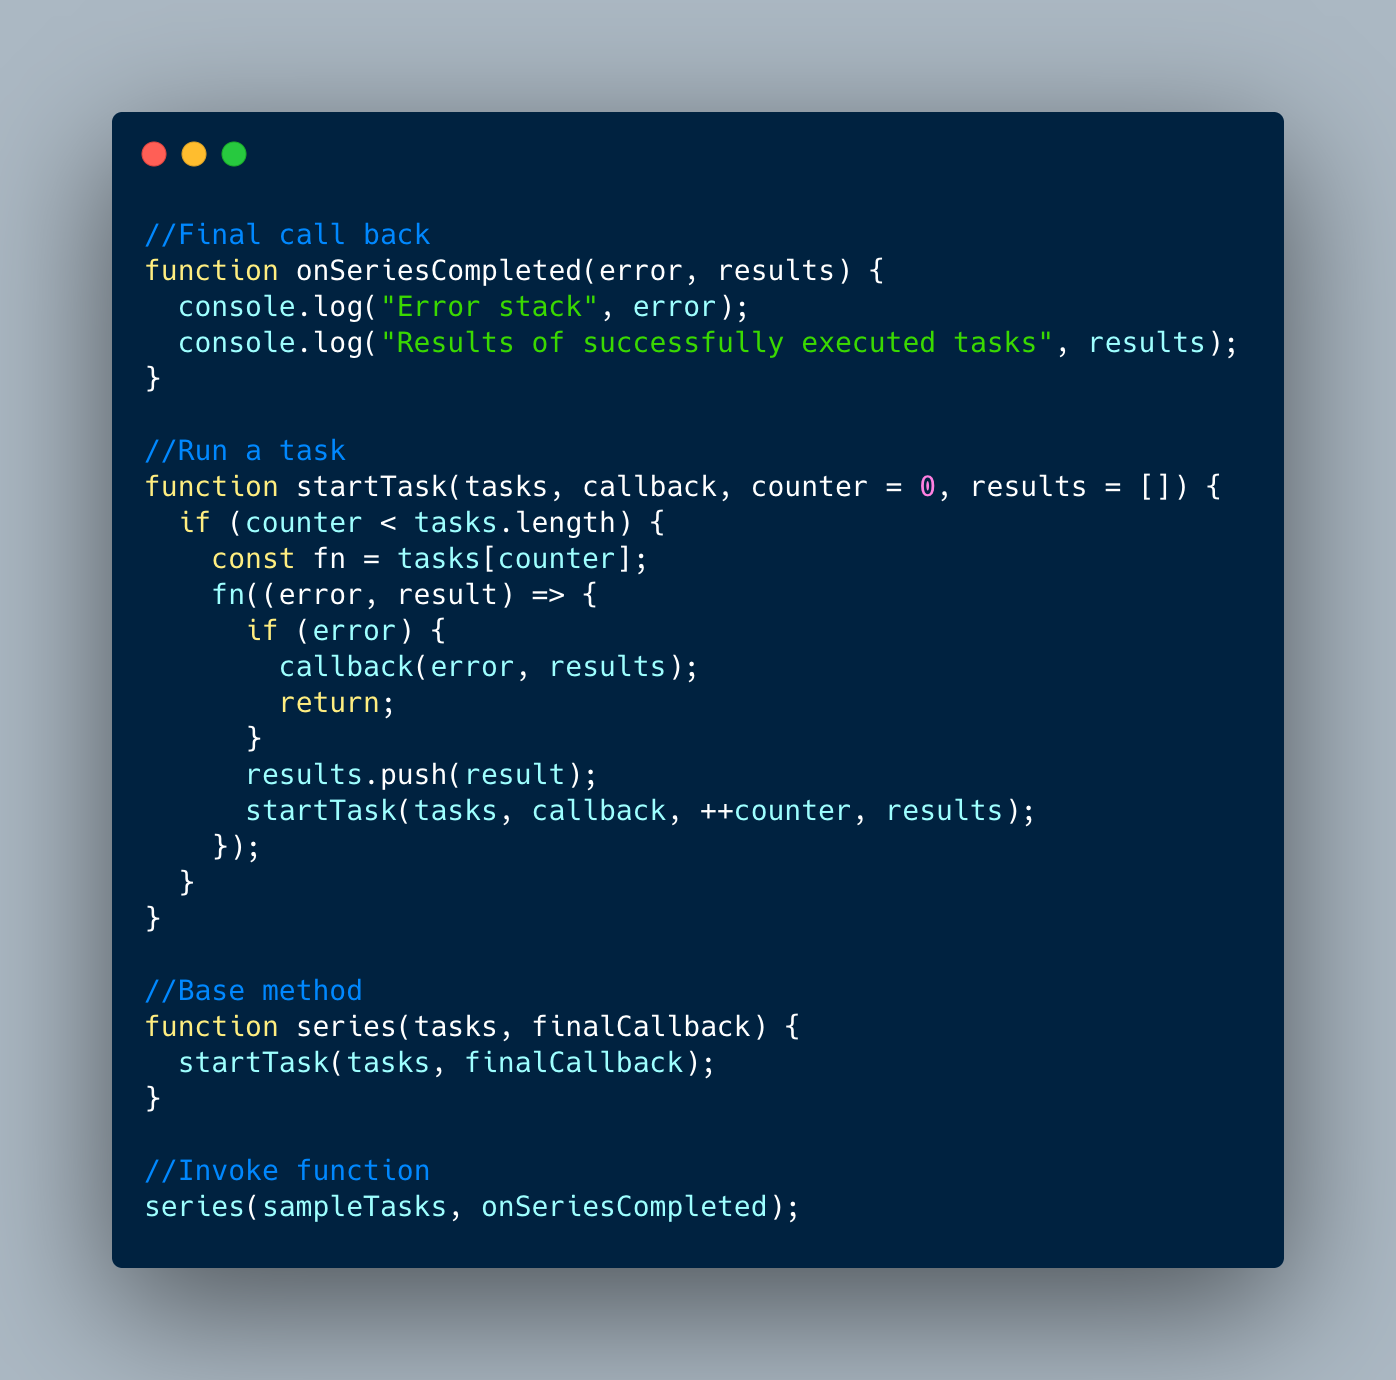
We are going to look into a recursive solution for the series method. Note that recursive always comes with a performance dent with a deeper call stack of instruction execution in the hardware.

The idea here will start with a function1 from the tasks array and then pass a wrapped callback function on reading the result of function1, then invoking function2 and vice versa. If any error occurs in the process, the algorithom will exit by calling the final callback with error and results collection.

    fn((error, result) => {
      if (error) {
        callback(error, results);
        return;
      }
      results.push(result);
      //invoke a recursive call to next method 
    });

The full code is available in the below code block and it is ready to execute in your console for analysis or debug to see how this works in action.

const sampleTasks =  [ function (callback) { setTimeout(function () { console.log("1"); callback(null, "one"); }, 200); }, function (callback) { setTimeout(function () { console.log("2"); callback(null, "two"); }, 100); }, function (callback) { setTimeout(function () { console.log("3"); callback(null, "three"); }, 90); }, function (callback) { setTimeout(function () { console.log("4"); callback(Error("some error")); }, 10); }, function (callback) { setTimeout(function () { console.log("5"); callback(null, "five"); }, 1000); }, ];
 
function onSeriesCompleted(error, results) {
  console.log("Error stack", error);
  console.log("Results of successfully executed tasks", results);
}

function startTask(tasks, callback, counter = 0, results = []) {
  if (counter < tasks.length) {
    const fn = tasks[counter];
    const fn2 = tasks[counter + 1];
    fn((error, result) => {
      if (error) {
        callback(error, results);
        return;
      }
      results.push(result);
      startTask(tasks, callback, ++counter, results);
    });
  }
}

function series(tasks, finalCallback) {
  startTask(tasks, finalCallback);
}

series(sampleTasks, onSeriesCompleted);

Output

Polyfill for Async.series(tasks, callback)

The series method was quite a different one when we compared it to other sequential call stacks. The series method will take two arguments one is an array of functions and another one is the finalCallback which is optional to call with the first occurred error and obtained results until then.


async.series( 
  [fn-1(callback), fn-2(callback), ... fn-n(callback)], 
  finalCallback( error, results ){ ... }
);

Now will talk about the implementation. We can solve this problem by making Asyncify each task from the tasks array. This way, we can extract the result from each task, review for errors, and move to the next task. Let’s move to the code implementation.

Asyncify a task


function Asyncify(task) {
  return new Promise((resolve, reject) =&gt; {
    task((error, result) =&gt; (error ? reject(error) : resolve(result)));
  });
}

That’s all we have completed with the implementation, and we need to use this method to queue up the tasks in a sequential way of execution.

async function series(tasks, finalCallback) {
  const allResults = [];
  for (let i = 0; i &lt; tasks.length; i++) {
    try {
      allResults.push(await Asyncify(tasks[i]));
    } catch (error) {
      finalCallback(error, allResults);
      break;
    }
  }
  console.log(allResults);
  finalCallback(null, allResults);
}

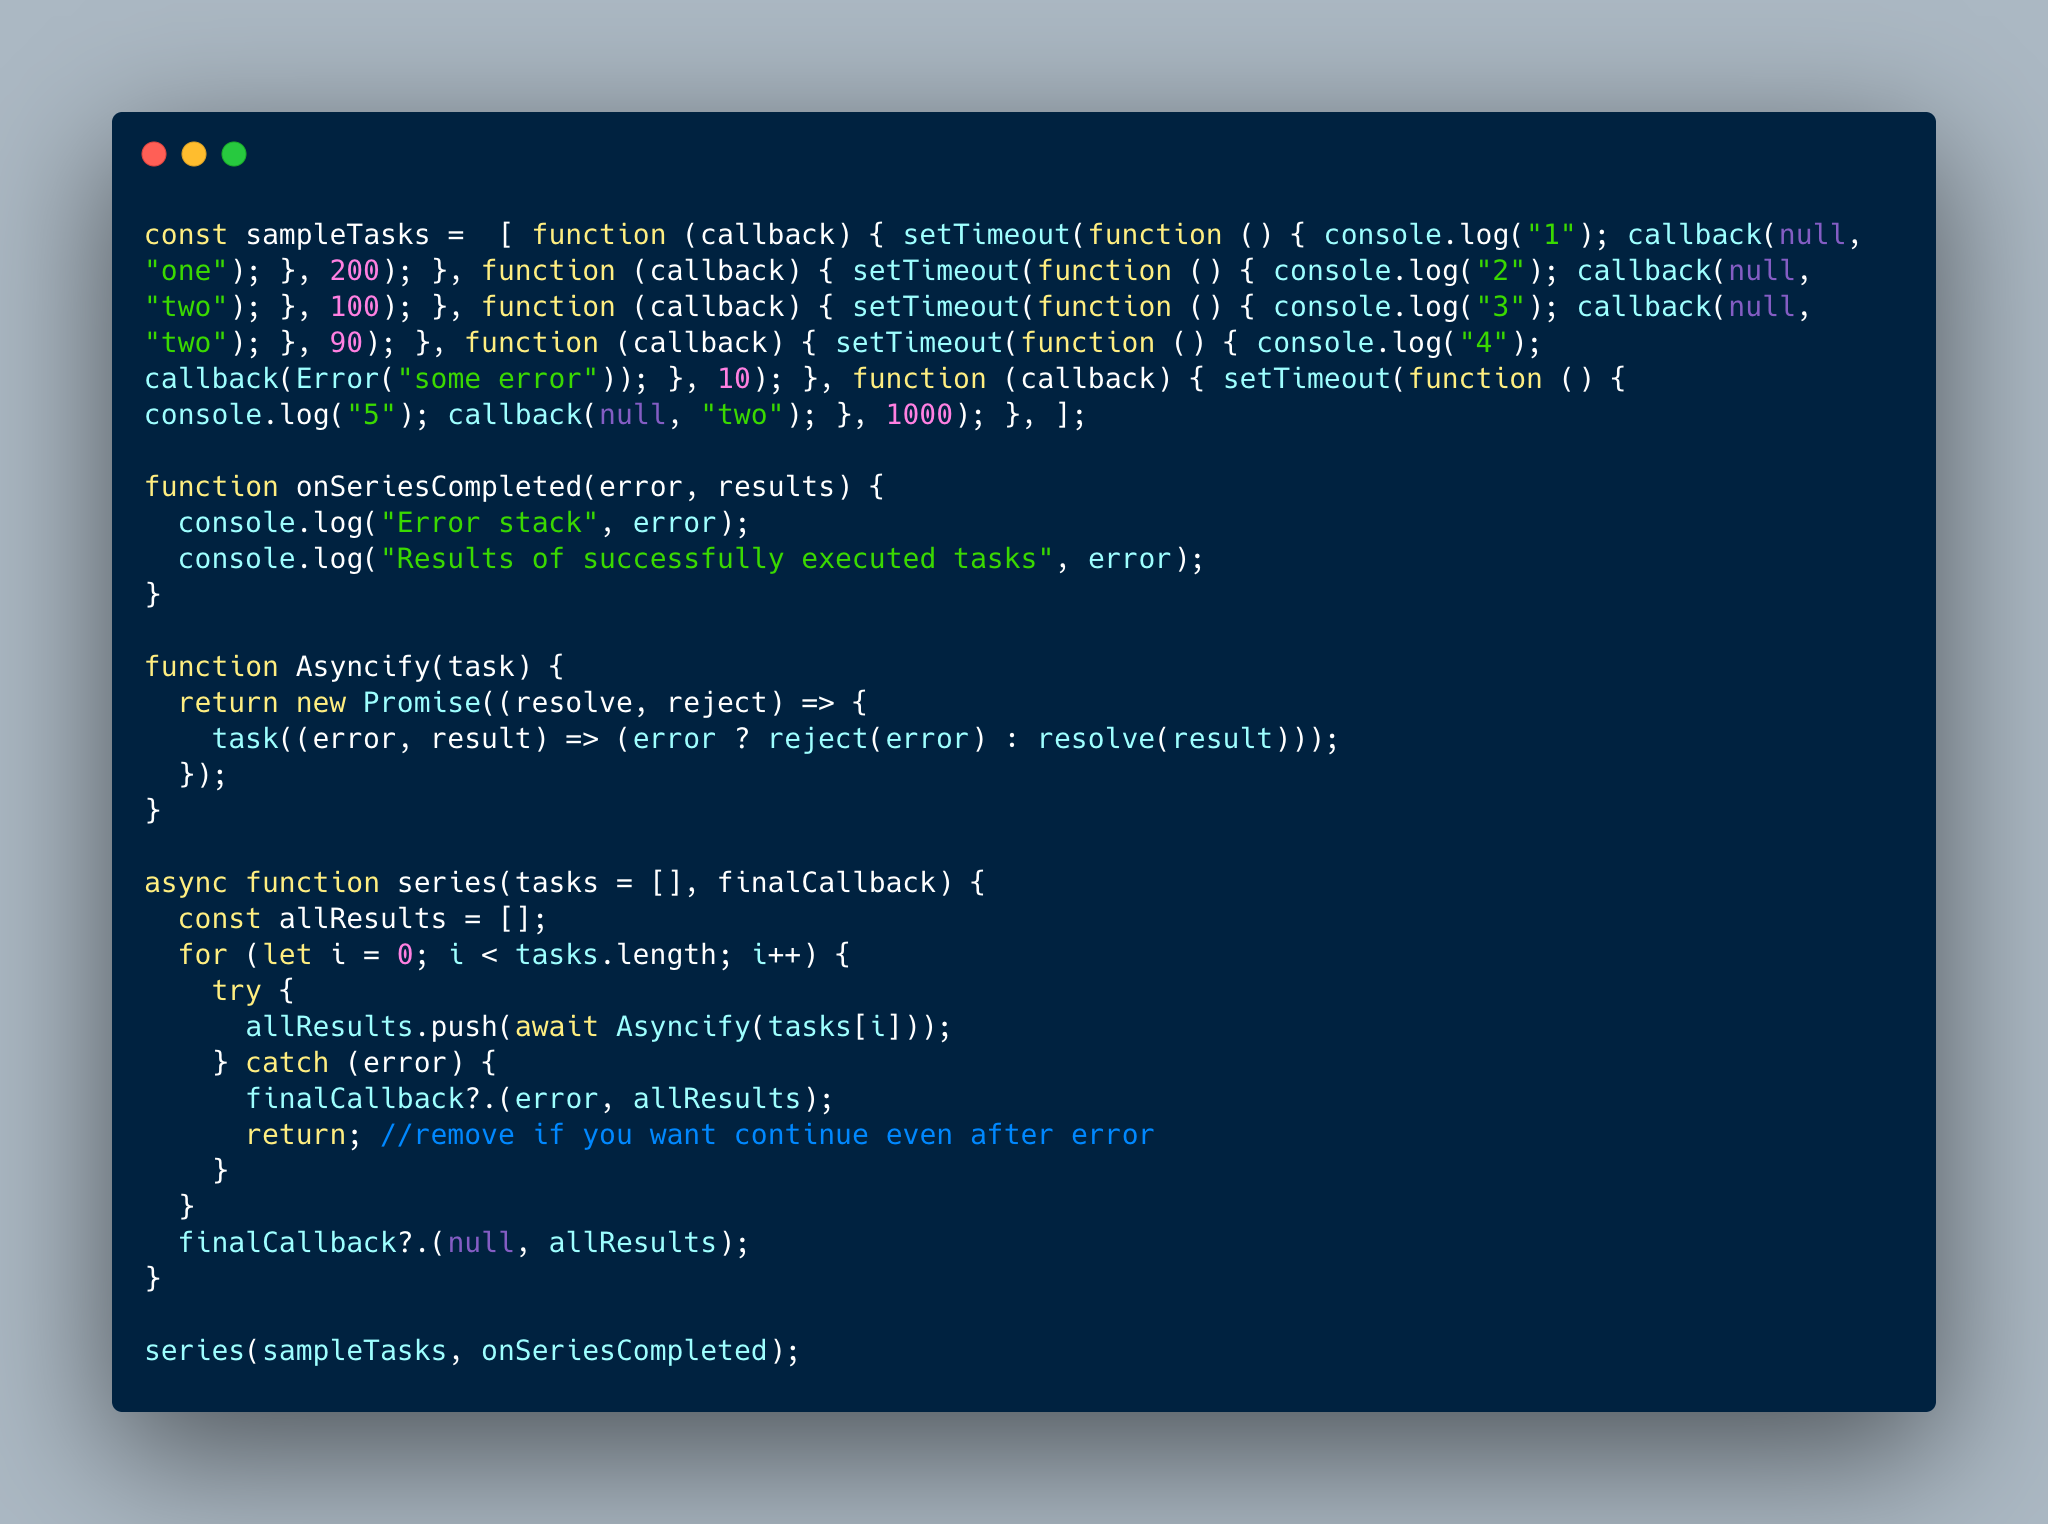
This solution is based on Promise API, and you can execute the below code in the browser console for quick analysis. And we can also implement a recursive-based solution and will look into it in our next post.
The full spec you can read from https://caolan.github.io/async/v3/docs.html#series.

Now, add some sample tasks to test and see how this works.

const sampleTasks =  [ function (callback) { setTimeout(function () { console.log("1"); callback(null, "one"); }, 200); }, function (callback) { setTimeout(function () { console.log("2"); callback(null, "two"); }, 100); }, function (callback) { setTimeout(function () { console.log("3"); callback(null, "three"); }, 90); }, function (callback) { setTimeout(function () { console.log("4"); callback(Error("some error")); }, 10); }, function (callback) { setTimeout(function () { console.log("5"); callback(null, "five"); }, 1000); }, ];

function onSeriesCompleted(error, results) {
  console.log("Error stack", error);
  console.log("Results of successfully executed tasks", results);
}

function Asyncify(task) {
  return new Promise((resolve, reject) => {
    task((error, result) => (error ? reject(error) : resolve(result)));
  });
}

async function series(tasks = [], finalCallback) {
  const allResults = [];
  for (let i = 0; i < tasks.length; i++) {
    try {
      allResults.push(await Asyncify(tasks[i]));
    } catch (error) {
      finalCallback?.(error, allResults);
      return; //remove if you want continue even after error
    }
  }
  finalCallback?.(null, allResults);
}

series(sampleTasks, onSeriesCompleted);

Output

Reactive Forms – Angular v5.x

In the last article, we discussed Template-driven forms and this article is going to explore about Reactive forms. Both Reactive and template-driven form available under @angular/forms with module names of ReactiveFormsModule and FormsModule respectively.Reactive forms required more coding than template-driven way, but these will give more control on forms than template-driven.
Reactive Forms:
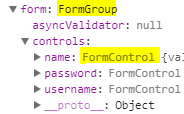
Instead of angular, we need to create FormGroup and FromControllers mapping between UI and form model.
Advantages:
1) Field Value and validity updates are always synchronous, so we won’t encounter the timing issues that sometimes occur in a template-driven form.
2) Reactive forms are easy to write Unit test cases because of most of the business logic available inside of the component.
REACTIVE DRIVEN DIRECTIVES:

  1. FormGroupDirective – Binds an existing FormGroup to a DOM element.
    • Usage: [formGroup]=”farmersForm”
  2. FormGroupName – Syncs a nested FormGroup to a DOM element.
    • Usage: formGroupName=”farmerAddress”
  3. FormControlDirective – Syncs a standalone FormControl instance to a form control element.
    • Usage: [formControl]=”farmerName”
  4. FormControlName – Syncs a FormControl in an existing FormGroup to a form control element by name.
    • Usage: formControlName=”farmerName”
      (alternatively) [formControl]=”farmersForm.controls.farmerName”
  5. FormArrayName – Syncs a nested FormArray to a DOM element.
    • Usage: formArrayName=”grainsTypes”

Simply:

Example: Live Example

Template Driven Forms API – Angular v5.x

Angular has rich form support regarding both template driven and reactive forms. This article is going to focus only on the template-driven forms and validations.
Template-Driven Forms :
Definition:
Angular will create FormGrop and FormControl objects based on applied directives like ngForm, ngModel, ngModelGroup and template reference variables from a form template.

TEMPLATE DRIVEN DIRECTIVES:

All above directives are available once we import FormsModule into application NgModule.
NgForm – Will create a top-level FormGroup instance and binds it to a form to track updates/validations.
NgModel – Will Creates a FormControl instance and will track input field value, events and validation rules.it will keep view and model in sync.
NgModelGroup – Will create a sub-group form controller to maintain nested structured model.
Simply:

Example: Live Example

Angular JS 1.x Security CSRF Protection

Defination: (Source:wiki)
Cross-site request forgery is an attack technique by which the attacker can trick an authenticated user into unknowingly executing actions on your website.
(or)
Cross-site request forgery, also known as one-click attack or session riding and abbreviated as CSRF or XSRF, is a type of malicious exploit of a website where unauthorized commands are transmitted from a user that the website trusts.
Prevention methods:

  1. Check standard headers to verify the request from same origin or not
  2. Check CSRF token and it’s validity against to user session Id.

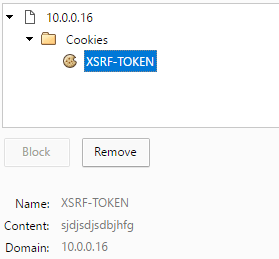
AngularJS will support by default to avoid CSRF attacks, we need to send XSRF-TOKEN into browsers cookie, then angular will automatically pick and append X-XSRF-TOKEN as a header.

Cookie info:

AngularJS with a general $http promise will prepare header with X-XSRF-TOKEN, if one of the domain cookies contains a token with XSRF-TOKEN key name.
If we want to change HTTP header key name, with custom  XSRF token we need to provide defaults.xsrfHeaderName so that angular will prepare with custom token key.
Please check below code snap from angularJS framework for better understanding of how it works:

var xsrfValue = urlIsSameOrigin(config.url) ?
     $$cookieReader()[config.xsrfCookieName || defaults.xsrfCookieName]
     : undefined;
if (xsrfValue) {
  reqHeaders[(config.xsrfHeaderName || defaults.xsrfHeaderName)] = xsrfValue;
}

And check out this working example, inspect HTTP headers via developer tools.

 var app = angular.module('csrf_example', []);
 app.controller('MainCtrl', function($scope, $log, $http) {
 document.cookie = "XSRF-TOKEN=sjdjsdjsdbjhfg";
 $http.get('path').then(function() {
 console.log('Network call done!');
 });
 });

Angular 2 – Router – Well usage of Depth first search (DFS)

One of the major module in angular 2 is router module, it will handle application navigation, authorization and application modularity.
Definition [Angular 2 router by @vsavkin]:
A router state is an arrangement of application components that defines what is visible on the screen.
Router is a tree of components, which will be navigable by user actions and based on URL segments it will move from one route to other route.
Sample routes: it’s an array of routes.

[{path: '', pathMatch: 'full', redirectTo: '/home'},
{ path: 'home', component: GoGreenAgriHome }
{ path: 'farms', component: AgriFarms },
{ path: 'agri-tech', component: AgriTech
children: [
{ path: ':id', component: AgriTechTypes}
]
}
]

A example code you can find at Github.

Angular 2.0 Hello World in 2 min

Finally angular js 2 shipped with the new web components. It’s modular based framework, which contains compiler, core, common, http and etc…
After Adobe Flex SDK, Angular is the first framework to address rapid fast development application needs, with the addition of angular material components it will become one of the best frameworks to build applications with new web standards.
To avoid complexity of setting up environment I made system config, which look for dependencies on UNPKG npm cdn network. So, it will avoid you all the process to setup your environment. Lets enter into application example.

  • Angular 2 is simple, latest web standards, lightning fast and works everywhere.
  • Angular with TypeScript will give us good application code maintenance, great editor support.
  • Angular-cli will help to create and build apps.

Angular2 With TypeScript Hello Word example:

  1. First we need a application root component, in our example we are using AppComponent as root component.
  2. A NgModule to initialize our app.
  3. Finally need to bootstrap our app by mentioning root module.
  4. Need a html wrapper to instantiate html component in the browser. i.e. <app></app>
  5. SystemJS config to find required module loading.
import { platformBrowserDynamic } from '@angular/platform-browser-dynamic';
import {Component} from '@angular/core';
import { NgModule }      from '@angular/core';
import { BrowserModule } from '@angular/platform-browser';
//Root Component
@Component({
    selector: 'app',
    template: `&lt;h1&gt;Hello {{ name }}!&lt;/h1&gt;`
})
export class AppComponent {
    name: string;
    constructor() {
        this.name = 'Angular 2';
    }
    //Lifecycle init method
    ngOnInit() {
      console.log('AppComponent initialisation');
    }
}
//Root Module: NgModule to bootstrap your application
@NgModule({
    imports:      [ BrowserModule ], /*Allows your app’s module to use code from another module.*/
    declarations: [ AppComponent ],  /*Declares all components used in the  module.*/
    bootstrap:    [ AppComponent ]   /*Tells Angular 2 to bootstrap the 'Appcomponent' as the root of the application.*/
})
export class AppModule { }
//Bootstrap Angular 2 with the 'AppModule' NgModule.
platformBrowserDynamic().bootstrapModule(AppModule);

HTML wrapper:

&lt;!DOCTYPE html&gt;
&lt;html&gt;
&lt;head&gt;
  &lt;title&gt;Angular seed project&lt;/title&gt;
  &lt;meta charset="UTF-8"&gt;
  &lt;meta name="viewport" content="width=device-width, initial-scale=1"&gt;
  &lt;script src="https://unpkg.com/typescript@2.0.0/lib/typescript.js"&gt;&lt;/script&gt;
  &lt;script src="https://unpkg.com/core-js/client/shim.min.js"&gt;&lt;/script&gt;
  &lt;script src="https://unpkg.com/zone.js/dist/zone.js"&gt;&lt;/script&gt;
  &lt;script src="https://unpkg.com/zone.js/dist/long-stack-trace-zone.js"&gt;&lt;/script&gt;
  &lt;script src="https://unpkg.com/systemjs@0.19.37/dist/system.src.js"&gt;&lt;/script&gt;
  &lt;script&gt;
    var rxjsVer = "5.0.0-beta.12";
    //System Js Config, you may move it into systemjs.config.js
    System.config({
      transpiler: 'typescript',
      typescriptOptions: {emitDecoratorMetadata: true},
      map: {
        'app': './main.ts',
        '@angular': 'https://unpkg.com/@angular',
        'rxjs': 'https://unpkg.com/rxjs@' + rxjsVer
      },
    });
    //Load application root component file
    System.import('app').catch(function(err) {
      console.error(err);//If any eerors while loading root module
    });
  &lt;/script&gt;
&lt;/head&gt;
&lt;body&gt;
  &lt;app&gt;Loading...&lt;/app&gt;
&lt;/body&gt;
&lt;/html&gt;

Working Plunker: http://embed.plnkr.co/prB7BO
Angular 2 ES5 Example:
working plunker:
http://embed.plnkr.co/y5tuUIBEBDWO3d254pCf